Sunday 23 February 2014

Exploring Estella: Beautifully Heartless - Hair

'hung upon Estella's beauty, hung upon her words, hung upon her gestures, and sat mumbling her own trembling fingers while she looked at her, as though she were devouring the beautiful creature she reared.' 
Adopted by Miss Havisham at a young age, Estella never gets an opportunity to find her own identity. Miss Havisham raises Estella as a deadly weapon to avenge her broken heart. Although we know that Estella is supposed to be very beautiful, she has no individualised physical presence within the novel, she is described through gestures and little physical detail. Estella therefore seems to be objectified, we are given the impression that Estella is a rather expensive and valuable possession rather than a human being.
Estella is often portrayed with jewellery.
“Miss Havisham watched us all the time, directed my attention to Estella's beauty, and made me notice the more by tying jewels on Estella's breast and hair"
The jewels enhance Estella 's beauty, like the jewels, Estella is beautiful, valuable and cold. 
So, when we think of Estella, how do we see her? What does she look like? 
Personally, I would describe Estella as:

Cold Manipulative Beautiful Sinister Expensive Trapped

My aim now is to create the perfect Estella which will portray all these characteristics. 

What would Estella's hair look like? 


Available from: www.thevintagereader.com Last Accessed: 23 Feb 2014
Hair can say a lot about a person's character and personality. Loose curly hair can mean someone is gentle and romantic, whilst someone with dark hair in a tight up do may mean they are confident or older in age. 

A girl who wears her hair down, or in braids will appear more youthful and carefree. Whilst a girl with her hair up will appear more mature and restricted. The parting of the hair is also important, a middle parting was very popular in the Victorian era, however, a tight middle parting can appear harsh and create a cold character, especially on dark hair. On the other hand, no middle parting or side parting will bring softness into the hair. 

Estella's hair must be very beautiful, but also enhance her cold personality. 

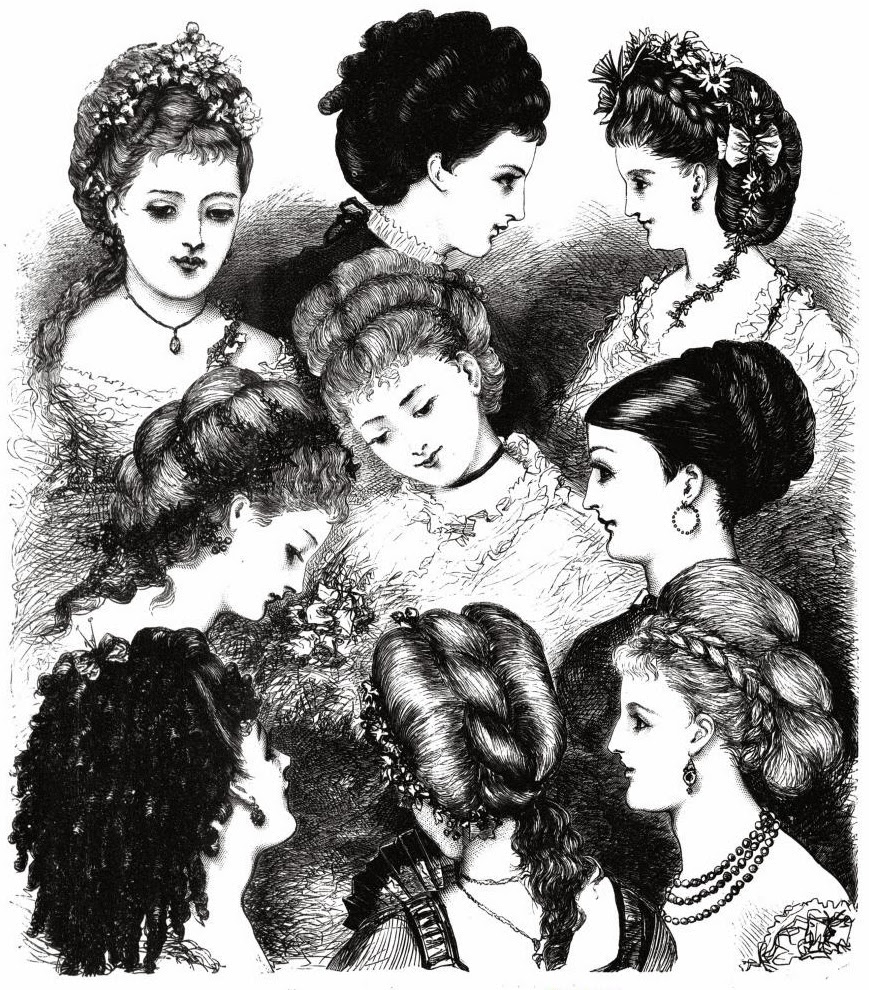
The portrait above shows girls with very dark hair in a middle parting, the middle parting is pulled apart very tightly to the sides making her look cold and stern. I wouldn't say this was particularly very beautiful though, it adds age to her face.


I really like this image. The hair is very beautiful, and is quite romantic. However, it still contains cold features, the roses embellished on the side of the head have quite angular corners and could be symbolic of Estella being a rose with many thorns. Look at the loose waves, although they make her appear more youthful, the waves are very defined and separate and makes it less romantic. However, the volume on the top of the head is soft,  this contrasts with the hard elements and could symbolise Estella's soft spot for Pip. Hair with volume on the top of the head is also a great feature of Victorian hairstyles.
Could Estella's hair decor give her hair more character? For instance, the hair comb is very gothic and steampunk, the shapes and edges of it are very harsh and the sharp points appear deadly. 

For my Estella design. I decided to add a romantic aspect through pinned up curls and loose ringlets, this creates irony as well as appearing very beautiful.  Although the texture of the hair is very soft, I feel that there is still a strong shape and definite outline. I also feel that the middle parting takes away some of the softness.


I photographed the steps in achieving my Estella hair.
I curled all of the hair from the back of the ears onwards. The hair at the front has been curled to form a wave
and is left clipped up to set. 
Front
Using a fat scrunchie, I tied up the hair in a high ponytail.

The hair is pinned up to cover the scunchie and create texture and volume. Two ringlets are left hanging
on either side of the head.
Profile View
The clips are taken out and the curls are combed through to create waves and then pinned up with a strong middle part.
Profile View
Small roses are pinned on the side. (Estella a rose with many thorns)
Note to self: The flyaways need to be tamed.
Feathers are added to heighten the up do.

Improvements

I feel that the hair updo does not show portray Estellas cold and cruel personality enough. In order to add more cruel and cold elements I feel that I should create a higher shape. To achieve this, I need to tie the ponytail up higher on the head. I also feel that the middle parting needs to be a harsher and more pulled apart and the curls on either side of the head to appear more uniform. Overall, the hair needs to be tighter, smoother and sharper. 


Special Effects Makeup: Cuts & Wounds

Cuts and wounds have been revisited, this time, we played with collodien and tuplast. 

I have already written about creating cuts a couple of blogposts back so read back for a list of products that you will need to create cuts and wounds! 

This is what I have achieved during the practical: 

Here is a fresh cut on the cheek created with wax. You can also see that I have created a black eye as an additional effect. The cut looks dirty and patchy, vaseline has also been applied to the area to make it appear more swollen. 

Here is a closeup of the cut.

As a cut ages, the blood will start to thicken and dry and accumulate as scabbing, so above is my attempt at achieving this look, I mixed some 'dirt' with fake liquid blood and applied it onto the cut with a small brush.


This scarring on the lip is created with non flexible collodien. 

Using collodien (non - flexible) 

1. Make sure skin is clean, apply derma shield to the area you will be applying the collodien.

Note: Collodien is safe for the skin how ever, it is alcohol based, so it will have a stinging effect when applied to the face. Derma shield is a barrier cream which will create a barrier between makeup and the skin, offering some protection. Derma shield is much better as a barrier cream for special effects makeup because, although a moisturiser can act as a barrier cream, it is greasy, therefore, it is not recommended when using wax or latex as the products will not stick and may slip off. 

2. Apply the collodien to the area, avoid the eyes and delicate areas. 

3. Dry the collodien with a hairdryer. Make sure that you put it on low heat and a low setting and test it on yourself before using it on your subject. 

4. Once completely dry, add colour and contour if needed. 


Sunday 16 February 2014

Havisham Hair Development & Silhouette

Above: Mood board of hair inspirations for Miss Havisham
Over the past couple of weeks, I have been practising the French pleat. The French pleat isn't a Victorian hairstyle, however, you can add many Victorian details. The picture below is my main inspiration for the silhouette:


After adding Victorian elements, I thought what I could do to the hair to add decay and eccentric elements to create the Miss Havisham character.


I was encouraged to create hair that would give a strong silhouette.


Remember the hair design that I created?


This is the silhouette I produced the second time I did the hair.


 You can see here that the hair has a strong shape but lacks the decay and eccentric elements. To resolve this problem, I added flower and a veil to add a more interesting silhouette.


I am happy with the final silhouette, the lace and ribbon contrasts with the strong structure and creates a romantic element, and I like fragile feeling the ringlets on the top give. 

I want to now experiment with more textures and accessories to add more contemporary elements whilst keeping it Victorian and adding more eccentric and decay features. 


Special Effects Makeup: The Illusion of illness

In Sue's practical, we were given a demonstration on how to create the illusion of sickness and fever. This will help with my development of Miss Havisham. 

First of all, I need to understand what illness looks like and what kind of illness I want to create, do they have cracked lips, sweat, rashes? I also need to think about how ill they are and in what stage of the illness they are in. 

The products that you will need to create the illusion of illness are: 

Kyolan Supracolour - grease based pigments that blend and mix well 

Glycerin - to create sweat or tears 

Eyedrops - to create watery eyes

Latex/Eyelash glue - to create dry or peeling skin, good for cracked lips

Stipple sponges - good to use to break up smoothness and create rash like appearances on the skin. 


Above is my attempt at creating the illusion of a fever. 

1. Prep the skin - tone and moisturise 

2. Conceal spots and scars that the model may have, conceal anything that would affect the makeup's continuity. 

3. Using supracolour palette, create brown and reddish purple shades & create a tired looking eye. avoid using too much blue and purple tones as this will create more of a bruised eye effect. To make the colours more translucent, mix in some moisturiser, this will create a more natural look. 

4. Using a red lip or eyeliner line the waterline and blend out, this will create tired and sore looking eyes. 

5. Use a red shade and with a stipple sponge, stipple it over the face to create rash like and broken vein effects. 

6. Stipple a darker blue-red shade onto the cheeks. Remember to add a variety of shades. 

7. Apply a slight blue tinge onto the lips. 

8. Apply some due eyelash glue/latex onto the lips, wait for it to go clear and when it is dry, pick up the edges with your fingers to create the illusion of dry cracked lips. If you want, add some liquid blood to the cracks of the lips. 

9. To create dry skin, dab and rub latex on the skin and powder over with translucent powder, be careful not to remove the makeup you have already applied underneath by pulling the latex off the skin. 

10. To add sweat, using a stipple sponge and a small amount of glycerin, stipple onto the nose, forehead and upper lip. 

Note: Wherever there is skin showing, e.g the hands, neck or chest needs to be made over and always test for latex allergy before application. 

Testing Miss Havisham Makeup : BRUISE PALETTE

Moodboard of makeup and colour inspirations


Above is the face chart that I have created inspired by the bruise palette. This look consists of dark plums and purples along with yellows and greens. The idea behind this look is to create tired looking eyes, a sunken face and bruised puffy eyes. The white dots around the eyes is supposed to appear like flaking skin, but close up looks almost beautiful, I also had the idea that it would look like the skin around her eyes is moulding with some tones of yellow and green. I want to keep the eyebrows fairly natural, but roughen them up to create a unkept  and wild effect. I want a pale base and dry cracked skin with a dusty effect and chapped lips. 

Here is the outcome: 


To create this look, I used: 

  • Illamasque white foundation
  • Illamasque matt base 
  • Illamasque Transluscent powder 
  • Kyolan Bruise Wheel 
  • 160 Colour Palette 
  • Brush Kit 

How I created the look

1. Prep the skin: tone and moisturise. 

2. Apply matt base, this will ensure a matt finish eliminating any skin and enhance the colours that will be applied. 

3. Apply white base, buffing and blending to let the natural skin show through to create a more natural effect. 

4. Using the Kryolan bruise wheel, create dark circles making sure to blend well and avoid harsh lines. 

5. Using a pink creamy blush apply to the centre to the lids and centre on the bottom eye line to create a puffy-eyed effect. 

6. Powder the face. 

7. Using a dark black eyeshadow, emphasise the crease and outer corners of the eyes and the bottom lash line. Blend out and smudge. 

8. Using a thin eyeliner brush, dot white on the outer and inner corners of the eye. This will create a flaky skin effect. 

9. Apply base and a purple reddish colour on the lips and apply a thin layer of eyelash glue. When dry, peel back the latex to create a cracked lip. 

10. Apply a dark purple shadow on the outer corners and cupids bow to define the lips and smudge out. 

11. Contour the face to create a gaunt appearance, calve the cheekbones and temples. 

12. Using an eyebrow comb, dip into white base and dot onto the forehead and the top of the cheekbones to create the illusion of dust. Also add greyish grey and blue tones. 

13. Comb through the eyebrows backwards to create a wild effect. 


Improvements

  1. Add more tones to the 'dust' which has fallen onto the face.
  2. Contour the face more: contour the nose and brow bone too. 
  3. Make the eyebrows less modern: get rid of the arch. 
  4. Maybe add a tear to create more character. 


Exploring MIss Havisham: The Real Deal

Beloved sweetheart bastard. Not a day since then
I haven’t wished him dead. Prayed for it
so hard I’ve dark green pebbles for eyes,
ropes on the back of my hands I could strangle with.

Spinster. I stink and remember. Whole days
in bed cawing Nooooo at the wall; the dress
yellowing
, trembling if I open the wardrobe;
the slewed mirror, full-length, her, myself, who did this

to me? Puce curses that are sounds not words.
Some nights better, the lost body over me,
my fluent tongue in its mouth in its ear
then down till I suddenly bite awake. Love’s

hate behind a white veil; a red balloon bursting
in my face. Bang. I stabbed at a wedding-cake.
Give me a male corpse for a long slow honeymoon.
Don’t think it’s only the heart that b-b-b-breaks.


Carol Ann Duffy 

Above is a poem written by Caroln Ann Duffy about Miss Havisham's feelings and emotions. I have highlighted the key words and phrases which describe her appearance. 

From the descriptions of Miss Havisham in the novel and the keywords from the poem above, we all know Miss Havisham as the following: 

> Pale skin due to lack of sunlight 

> Dark circles under the eyes

> Gaunt frame 

How could I make my Miss Havisham more unique and realistic? 
What other factors could affect the way Miss Havisham looked? 

SKIN 

Miss Havisham's hygiene must have been very bad, therefore, it would  be likely that she had skin problems such as flaking, itches and rashes. She would have worn her veil for a very long time, this could have caused the pattern of the lace to imprint on her face when she slept. 


AGE 

Many adaptations has portrayed Miss Havisham as very old and shrivelled.

However, when you read the novel, Miss Havisham should only be in her mid 40s or even younger. On the other hand, the life expectancy in the Victorian era was very short, so to be alive when you were in the mid 40s was a surprise. Another reason why Miss Havisham is portrayed as very old may be because she is perceived through a child's eyes, meaning that her appearance may be over exaggerated. However, I want to create a more realistic Miss Havisham who is surprisingly beautiful. 

Margaret Leighton as Miss Havisham in Great Expectations 1974 

ILLNESS

Is Miss Havisham ill? It would not be surprising if she was weak and fragile, from having not had any sunlight in years. She would have also been living amongst dust and her dirty garments for decades which must have given her an itch. So, would Miss Havisham be feverish and sweaty, or dry and flaky? 
Miss Havisham also must be mentally ill for trying to stop time. 


Saturday 8 February 2014

2NE1 IT HURTS


2NE1 is a Korean music group, I was browsing their music videos on Youtube and stumbled across this. Straight away, I noticed that there are many gothic and decay elements - which reminded me of Miss Havisham's character. I also really liked the styling of the girls in this music video, although it is very contemporary and alternative, I was paying most attention to the hair styling. There was use of very strong shapes: 


This gave me the idea that Miss Havisham might be trying to preserve herself for her love. It also reminds me that Miss Havisham's hair would have not stopped growing, so she must have had a lot of hair. 


Its just a thought :) 

Special Effects Makeup: Cuts & Bruises

In today's practical session, we were shown how to create cuts and bruises with different materials and techniques. 

In Great Expectations, Estella had an abusive relationship with her husband Drummle. When designing my Estella character, I have to keep in mind what section of the book I am portraying Estella in. If I choose to create the Estella when she is married to Drummle, I should think about the physical evidence of suffering. 

To get my head around cuts and bruises, I have used some references in order to achieve realistic effects. 


You can see above that this black eye has aged, I can tell because of the yellow green tinge: this often happens when the bruising and swelling is being saturated in the healing process. It is very important to pay attention to the age of the cut or bruise because a wound will grow and develop and heal, meaning that it will look different after certain time periods. 

You can see the stages of having a black eye in the image below: 


To create bruising, you will need the following products: 

Note: grease based pigments are the best to create a very natural effect because they are very easy to blend. You want the bruising to appear like its coming from under the skin rather than just product that has been applied over the top. 


> Supracolour palette by kyolan/ bruise wheel/ cuts and bruises 

> Vaseline

> Soft blending brushes 


1. To begin with, you need to remove all makeup and tone the skin. Do not apply moisturiser if you are going to create cuts along with the bruising because it may cause the wax you use later on to slip off. 

However, someone can be really made-up and then hurt themselves, in this case, you will need to create the bruising first then apply the makeup, which should be a bit messed up. 


2. To create my bruising, I used the Kyolan bruise wheel and cuts and bruises palette. You can use the Kyolan supracolour, or any grease based pigments as they mix and blend well. 
I started off with a yellow greenish tone as a base and blended it away making sure there was no harsh edges. You can also mix the colours with a little amount of vaselin to create a more transparent natural effect. Of course, if you are doing very badly bruised areas, you may want to keep the pigment more opaque. 

3. Line the waterline with a red lipliner or eyeliner. This will create a tired looking sore eye. 

4. Apply purple red tones, bad bruising will contain very dark blue purple tones. 

5. Blend, but do not over blend. 

6. Do not go below the eye socket with dark colours as this may look unrealistic. 

7. Take note of where people normally hurt themselves, people generally hurt themselves on points, such as points on the face, elbows and knees. 


Above is my finished black eye, I intended it to be a aged bruise, meaning a week after the injury, meaning that there will be more yellow and reddish tones rather than dark purple blue tones. 

DO NOT POWDER BRUISES, you want to create a illusion of swelling instead, to achieve this, add I thin layer of vaseline over the top. 

CUTS

To create cuts and grazes, you will need the following: 

> Moulding wax

> Sealer 

> Fake blood 

> Bruise wheel 

> Vaseline 

> Stipple sponge

> Thin eyeliner brush 

> Palette knife


1. Make sure the skin is clean and there is no moisturiser applied because this can cause the wax to slip off. 

2. Take a small amount of wax and massage it on the back of your hand with a palette knife, this will warm up the wax and make it easier to work with. 

3. Apply the wax to the area, apply in small amounts, you can build it up slowly. Keep wiping the palette knife after every application because it can take of the wax on the applied area if you go back in with a knife with wax residue. 

4. Smooth out the wax with moisturiser. 

5. Create the cut. 

6. Seal the entire cut with sealer and wait till it is completely dry. 

7. Powder over the cut and apply a skin tone base to it to blend into the skin.

8. Add bruising if necessary.

9. Add blood, thick blood for an older cut and runny blood for a fresh cut. 

Note: If you are using liquid blood, if will run in the direction of how the model is posed, liquid blood is normally added in the position the person is hurt, so it runs the right way. 

10. Stipple sponges create good graze like effects


Above is my attempt at a series of cuts in a claw like formation. I feel like I could have added darker blood on the inside of the cut to create more dimension and depth. 


Here is someone else's attempt, you can see that fake puss is added to the cut to create more impact. You can by fake puss and dirt to add to cuts from Charles Fox to create more realistic effects. 

Adding coffee granules to fake blood will make it darker and once applied will create a scab like effect.