Sunday, 16 February 2014

Exploring MIss Havisham: The Real Deal

Beloved sweetheart bastard. Not a day since then
I haven’t wished him dead. Prayed for it
so hard I’ve dark green pebbles for eyes,
ropes on the back of my hands I could strangle with.

Spinster. I stink and remember. Whole days
in bed cawing Nooooo at the wall; the dress
yellowing
, trembling if I open the wardrobe;
the slewed mirror, full-length, her, myself, who did this

to me? Puce curses that are sounds not words.
Some nights better, the lost body over me,
my fluent tongue in its mouth in its ear
then down till I suddenly bite awake. Love’s

hate behind a white veil; a red balloon bursting
in my face. Bang. I stabbed at a wedding-cake.
Give me a male corpse for a long slow honeymoon.
Don’t think it’s only the heart that b-b-b-breaks.


Carol Ann Duffy 

Above is a poem written by Caroln Ann Duffy about Miss Havisham's feelings and emotions. I have highlighted the key words and phrases which describe her appearance. 

From the descriptions of Miss Havisham in the novel and the keywords from the poem above, we all know Miss Havisham as the following: 

> Pale skin due to lack of sunlight 

> Dark circles under the eyes

> Gaunt frame 

How could I make my Miss Havisham more unique and realistic? 
What other factors could affect the way Miss Havisham looked? 
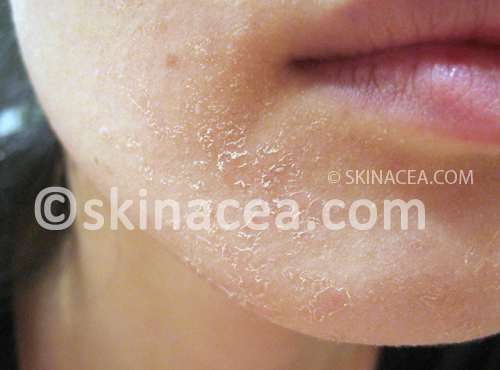
SKIN 

Miss Havisham's hygiene must have been very bad, therefore, it would  be likely that she had skin problems such as flaking, itches and rashes. She would have worn her veil for a very long time, this could have caused the pattern of the lace to imprint on her face when she slept. 


AGE 

Many adaptations has portrayed Miss Havisham as very old and shrivelled.

However, when you read the novel, Miss Havisham should only be in her mid 40s or even younger. On the other hand, the life expectancy in the Victorian era was very short, so to be alive when you were in the mid 40s was a surprise. Another reason why Miss Havisham is portrayed as very old may be because she is perceived through a child's eyes, meaning that her appearance may be over exaggerated. However, I want to create a more realistic Miss Havisham who is surprisingly beautiful. 

Margaret Leighton as Miss Havisham in Great Expectations 1974 

ILLNESS

Is Miss Havisham ill? It would not be surprising if she was weak and fragile, from having not had any sunlight in years. She would have also been living amongst dust and her dirty garments for decades which must have given her an itch. So, would Miss Havisham be feverish and sweaty, or dry and flaky? 
Miss Havisham also must be mentally ill for trying to stop time. 


Saturday, 8 February 2014

2NE1 IT HURTS


2NE1 is a Korean music group, I was browsing their music videos on Youtube and stumbled across this. Straight away, I noticed that there are many gothic and decay elements - which reminded me of Miss Havisham's character. I also really liked the styling of the girls in this music video, although it is very contemporary and alternative, I was paying most attention to the hair styling. There was use of very strong shapes: 


This gave me the idea that Miss Havisham might be trying to preserve herself for her love. It also reminds me that Miss Havisham's hair would have not stopped growing, so she must have had a lot of hair. 


Its just a thought :) 

Special Effects Makeup: Cuts & Bruises

In today's practical session, we were shown how to create cuts and bruises with different materials and techniques. 

In Great Expectations, Estella had an abusive relationship with her husband Drummle. When designing my Estella character, I have to keep in mind what section of the book I am portraying Estella in. If I choose to create the Estella when she is married to Drummle, I should think about the physical evidence of suffering. 

To get my head around cuts and bruises, I have used some references in order to achieve realistic effects. 


You can see above that this black eye has aged, I can tell because of the yellow green tinge: this often happens when the bruising and swelling is being saturated in the healing process. It is very important to pay attention to the age of the cut or bruise because a wound will grow and develop and heal, meaning that it will look different after certain time periods. 

You can see the stages of having a black eye in the image below: 


To create bruising, you will need the following products: 

Note: grease based pigments are the best to create a very natural effect because they are very easy to blend. You want the bruising to appear like its coming from under the skin rather than just product that has been applied over the top. 


> Supracolour palette by kyolan/ bruise wheel/ cuts and bruises 

> Vaseline

> Soft blending brushes 


1. To begin with, you need to remove all makeup and tone the skin. Do not apply moisturiser if you are going to create cuts along with the bruising because it may cause the wax you use later on to slip off. 

However, someone can be really made-up and then hurt themselves, in this case, you will need to create the bruising first then apply the makeup, which should be a bit messed up. 


2. To create my bruising, I used the Kyolan bruise wheel and cuts and bruises palette. You can use the Kyolan supracolour, or any grease based pigments as they mix and blend well. 
I started off with a yellow greenish tone as a base and blended it away making sure there was no harsh edges. You can also mix the colours with a little amount of vaselin to create a more transparent natural effect. Of course, if you are doing very badly bruised areas, you may want to keep the pigment more opaque. 

3. Line the waterline with a red lipliner or eyeliner. This will create a tired looking sore eye. 

4. Apply purple red tones, bad bruising will contain very dark blue purple tones. 

5. Blend, but do not over blend. 

6. Do not go below the eye socket with dark colours as this may look unrealistic. 

7. Take note of where people normally hurt themselves, people generally hurt themselves on points, such as points on the face, elbows and knees. 


Above is my finished black eye, I intended it to be a aged bruise, meaning a week after the injury, meaning that there will be more yellow and reddish tones rather than dark purple blue tones. 

DO NOT POWDER BRUISES, you want to create a illusion of swelling instead, to achieve this, add I thin layer of vaseline over the top. 

CUTS

To create cuts and grazes, you will need the following: 

> Moulding wax

> Sealer 

> Fake blood 

> Bruise wheel 

> Vaseline 

> Stipple sponge

> Thin eyeliner brush 

> Palette knife


1. Make sure the skin is clean and there is no moisturiser applied because this can cause the wax to slip off. 

2. Take a small amount of wax and massage it on the back of your hand with a palette knife, this will warm up the wax and make it easier to work with. 

3. Apply the wax to the area, apply in small amounts, you can build it up slowly. Keep wiping the palette knife after every application because it can take of the wax on the applied area if you go back in with a knife with wax residue. 

4. Smooth out the wax with moisturiser. 

5. Create the cut. 

6. Seal the entire cut with sealer and wait till it is completely dry. 

7. Powder over the cut and apply a skin tone base to it to blend into the skin.

8. Add bruising if necessary.

9. Add blood, thick blood for an older cut and runny blood for a fresh cut. 

Note: If you are using liquid blood, if will run in the direction of how the model is posed, liquid blood is normally added in the position the person is hurt, so it runs the right way. 

10. Stipple sponges create good graze like effects


Above is my attempt at a series of cuts in a claw like formation. I feel like I could have added darker blood on the inside of the cut to create more dimension and depth. 


Here is someone else's attempt, you can see that fake puss is added to the cut to create more impact. You can by fake puss and dirt to add to cuts from Charles Fox to create more realistic effects. 

Adding coffee granules to fake blood will make it darker and once applied will create a scab like effect. 


Thursday, 6 February 2014

Creating Hair Shapes

In the past week, we have been looking at various Victorian hairstyles and silhouettes in order to develop our ideas for Miss Havisham and Estella. 


From the photos of Victorian portraits above, you can see that there are common aspects. We can see that the prominent middle parting is very popular, we can also see that the hair has a lot of volume at the top of the head or at the back. I have noticed that volume at the top of the head looks a lot more youthful, however, when the hair is pulled tightly back with volume at the back, a more mature shape is created. Victorian women normally had a lot of texture put into their hair such as waves, curls and ringlets. 


Above are very interesting silhouettes of Victorian hairstyles and it is very inspiring to see the outlines of the shapes. I can now start to think about what shapes I want to create and what skill and materials I need to create it bearing in mind the effect that I want to create. I feel that the two women on the left look a lot sweeter and younger whilst the two women on the right look a older.  


Here, we can see that a lot of texture and shape has been used to create this hairstyle. I love the use of feathers and jewels. This inspires me to look at objects I could use to create my hair for Miss Havisham. I could use a cobweb like texture, lace, jewels, and even insects and bone pieces to create a more unique look. 


We can see here that lace has been used to decorate the hair and also act as a diffuser, this creates a mysterious effect as the person looking at the hair might have to look longer and deeper, paying more attention. This might mean that you can add a lot of intricate details that are not obvious and details that might shock the audience.

Last week we looked at the silhouette and shape of the classic french twist. We have advanced and are starting to look at ways in which we can alter it to create a potential hair design for Miss Havisham. 


My aim was to create a french twist with a strong structure and a lot of volume and shape at the top of the head. 


You can see that in the photo above I have tried to re-create the big rounded quiff-like structure at the top of the head. I was pleased with the french twist, however, I feel that the gap between the twist and the shape at the top of the head appears awkward and unfinished. 


Above is a photo of the opposite side, you can see the detail of the twist, I have added loose curls on either side to create a softer look, however, I still feel that the hardness of the shape at the top of the head isn't fitting. It looks too smooth and tight, I feel that I need to add a lot more texture such as waves, crimps and curls to resolve this problem. I also think that it doesn't hang low enough onto the forehead. 


Above, you can see that I have tried to improve the hair slightly by rearranging the twist so there is less of a gap in-between the 'quiff' and the french twist. 


We were also encouraged to 'decay' the hair, creating a more Havisham piece, however, there was not enough time in the practical to do so further experimentation was done in my own time. 


To begin with I tried to recreate and add to the shape that I created in class. As you can see, there is a lot of texture in the front piece. I created the front shape with a pre-curled synthetic wig and secured it onto the head. I am really happy with the shape. 


This is the profile of the hair, I love the silhouette. I feel I have corrected the shape of the front piece and I also feel that it transitions well into the french twist instead of having the awkward gap in between when I first experimented. I have also added crimps to add a little texture on the sides as Victorian women often had sheep like textured hair. 


Above is a photo of the hair from behind,I feel that since there is a lot of texture in the front of the head, the back should have less. I think the formation of the back looks romantic.


I then started to decay and take apart the hair, I backcombed and pulled out bits. I also sprayed dry shampoo at short proximity to some parts making the hair look grey, dry and dusty. 


Above, is again the profile, again, I have added streaks of grey. The hair still looks structured but still contains an element of decay. The french twist has unfolded and curls have dropped and I had left them hanging. 


The back of the hair now looks very dusty, I love the softness I have created when trying to decay the hair, it is romantic, which can imply that once, Miss Havisham must have been very beautiful.


I now feel that I need to find ways to accessorise the hair to add more detail and character. I find Miss Havisham's hair from the Helena Bonham version very inspiring as there is so much detail in which the eye can explore. 


Tuesday, 4 February 2014

Special Effects Makeup: Theatrical Ageing

In Sue's practical, we were shown how to achieve an older looking character through different makeup techniques. This is the start to developing our Miss Havisham character. 

The products needed for theatrical ageing: 

> SUPRACOLOUR 

This is a grease based palette, this means that the colours are easier to blend.

> BRUSH KIT 

Different brushes are needed to create different effects, e.g. a fine eyeliner brush is great for drawing on very fine wrinkles and blemishes. 

> BENKYE LATEX 

Latex can be used to crepe the skin, however, it is important to do an allergy test before applying latex as some people are allergic to the material.

> FOUNDATIONS & CONCEALERS 

You want to conceal anything you don't want to show, it is best to conceal everything and and create your own features as this will improve continuity. 

> POWDER 

Older people generally have dryer skin, so you must remember to powder generously and set the make up. 


You can see that above I have aged one side of the face. 
Here are the steps which I followed: 

1. Gown the model, you will be using a lot of pigmented products and powder and you do not want any spillages.

2. Moisturise skin well. This will serve a barrier between the makeup and the skin and will also help the makeup glide on better. 

3. Apply base, cover anything that you don't want to show. You can leave dark under eye circles but conceal any spots as this will help with the continuity of the makeup. 

4. Tell the model to pull a face and, using a small eyeliner brush and sepia brown pigment, trace the natural wrinkles that are created.( Around the eyes, forehead, around the lips and cheeks. You can also add old age spots.

5. Blend, shade and shadow. Retrace fine lines if needed. 

6. Using a contour shade, shade the areas which will become gaunt with age, e.g cheekbones & sides of the nose & temples. 

7. Grey out and fade the eyebrows with grey spray on hair colour. Brush in the colour with a bristle eyebrow comb. You can also add streaks of grey into the hair, but make sure it starts at the very root. 

8. Highlight the face were the facial bones will be more protruding and between wrinkles. This will add dimension and more realism to the makeup. 

9. Get the model to purse the lips and using a foundation, go over the lips. This will create a dry, cracked effect. 

10. When you are happy, powder well. make sure that any skin showing is aged. 


If you want to crepe the skin to add more texture, you need: 

Liquid latex
Stipple Sponge 
Hairdryer

1. Stretch the skin in which you want to apply. 
2. Use a hairdyer to dry the latex whilst still stretching the skin. 
3. You can build up layers but make sure each layer is dry before you apply another.  

The Classic French Twist

In my first hair practical with Seema, I was shown how to do the classic French twist. It is a very elegant and structured up-do. 

A French twist can be styled in different ways, a tighter and higher structured French twist might portray a harsher meaner character whilst a soft wave or curly loose twist might portray a more gentle nature.


When creating a french twist, you will need: 

> Hair grips 
> Sectioning clips 
> Geisha Pins 
> Hair spray
> Heat protectant 
> Hair Brush
> Teasing brush 
> Inch Curling Iron 


1. Brush through hair. Start from bottom and work through to the top to prevent breakage. 

 2. Decide the parting, or if you want a parting at all. 

3. Create 3 sections. 

4. Apply heat resistant to prevent damage to hair. 

5. Curl hair towards the centre back of the head. 

6. Keep the burrow curl in place with a sectioning clip and leave to set. 

7. Set the curls in a brick wall structure. 

8. Release all curls, and brush out forming one big curl.

9. Backcomb pieces of hair with a teasing brush to create volume and lift. 

10. Cross grip hair to one side, making sure grips are secure and straight. 

11. Wrap the side of hair over the hand, twist and hold into place. 

13. Using geisha pins, secure the twist by pushing the pins through the cross grips. 

14. Style accordingly and set in place with hairspray of choice. 


After achieving this classic up-do, I thought about how to add certain details to it to add character:

How could I adjust the hair to allow it to portray a softer character? 

How could I add elements of decay to portray Miss Havisham? 


I then did a little more experimentation:


Here, you can see that loose curls can soften up the look, however, by loosening the back of the hair does not make the look look more romantic but just looks rushed. Instead, I should try adding more delicate fine feminine details. 


Here, i have tried to add a element of decay by backcombing and adding more volume to the top of the head. However, again, I need to pay more attention to detail and be more precise as I will be tested on continuity.